Introduction:
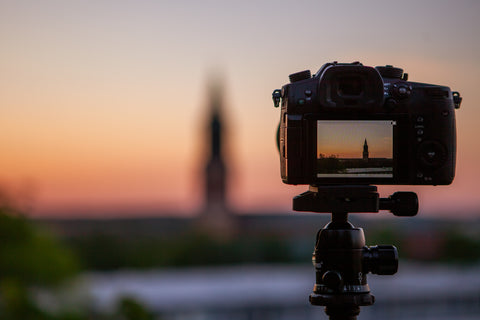
Greetings reader, and welcome to the start of our Back 2 Basics blog posts! This series of posts is aimed at anyone who wants to familiarize (or re-familiarize) themselves with the basics of photography, giving yourself a strong understanding of the fundamentals on which to build out your photographic techniques.
We'll be looking at all the need-to-know basics, such as the exposure triangle, white balance, key settings, composition and more (a word here that actually means: I can't think what else to put in this list at this very moment). We'll also be exploring how these concepts apply to the context of drones and aerial photography in future articles, ensuring that you can get the best results when you're up in the air.
Before we get started on on the fundamentals of photography, we must take a journey back in time, back to when it all started....(cue music and fade transition).
Part 1: Let there be Light
"And God said, Let there be light: and there was light. And God saw the light, and it was good.' And God said to man, 'Pointest ye thine camera at the light, and thou shallst capture an exposure.' Man did thusly, and God saw that the composition was a little too far left and asked man to adjust slightly, which he did. And God saw that it was good."
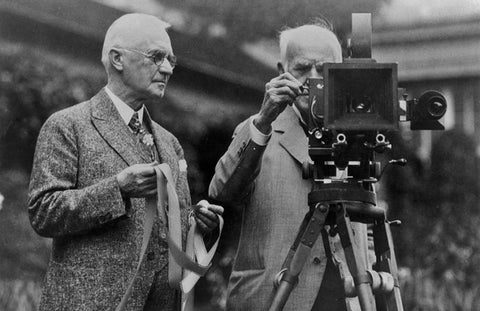
Maybe this is a little too far back. Also we at Beyond Visuals cannot confirm or deny the historical or religious accuracy of the above paragraph. Joking aside (for now), what's actually important here is the concept of light and how crucial it is to photography. Although God may have instructed Adam to put down the Apple (and pick up a Sony), the first record of the creation of a permanent image, and thus photography as we know it today, is actually attributed to Frenchman Joseph Nicéphore Niépce, who in the 1830s used a mix of lavender oil and bitumen on pewter to take an eight hour exposure of a barn. This process of using chemicals on plates to capture light continued over the next fifty years with various alterations and improvements being made to the procedure.
George Eastman revolutionized the process of taking exposures further when, in the 1880s, he invented roll films that disposed of plates to capture images. By coating paper with a mixture of light sensitive and light insensitive gelatin, he was able to perfect roll film with the aim of making photography available to everyone. Fast forward to 1975 and Kodak came through again, with engineer Steven Sasson using a CCD (Charged Coupling Device) sensor and a camera lens to record images on a digital cassette tape, producing what is widely recognized as the first digital camera.
This just about brings us up to speed with where we are today, with many cameras and phones using sensors, mostly CMOS (complementary metal-oxide-semiconductor active pixel image sensor) to take photos. Despite the rapid changes and evolution that photography has undergone over the past century or so, there has always been a single, irrefutable truth - photography is revolves around the capture of light. This is true for plate photography, roll film or digital sensors, and whilst cameras are now more available and feature packed than ever before, the rule remains the same - use a balance of settings to capture light.
That's it. Pat yourself on the back, print out a certificate (we haven't made one, you'll have to do that yourself), and go and challenge Annie Leibowitz to some kind of photographic duel to the death. Actually...hold off on that - you're not a master photographer yet. Granted, understanding that this art is all about light is a huge piece of the pie, but we still need to cover what controls light in modern day photographic apparatus and how it affects your images. Hold on to your horses.
Part 2: Let there be camera settings...lots and lots of camera settings
"And God said, 'Thine image is too bright. Hath I erred in splitting light from darkness? Perhaps I should have gone for a 25%/75% split instead?' And God checked man's camera settings and saw that he hath had his ISO turned up too high and said thusly, 'You complete pillock, for is is the middle of the day, I know because I hath created it, for what hath thou turned up the ISO?"
I'll pause briefly here to admit that I'm got carried away with the biblical references, but now that I've started I see no point in stopping - expect more on the way. So now you understand the importance of light in photography - if you still don't, try turning off the lights at night and walking around your apartment to experiment further.

As cameras have advanced, the software used to manage light and exposure have also improved, with many phones and cameras automatically managing your settings to try to give you the best results. Switching into manual mode on your camera is essentially you taking back control from the software and balancing the settings yourself get the best results. Think of yourself as John Connor fighting against the Terminator - you don't need no machine to do your work for you. What you most likely need is an English lesson to understand why you shouldn't used a double negative.
Anyway, in order to 'take back control' you need to understand what you're going to be controlling and how each aspect will individually affect the amount of light reaching the sensor. These aspects are those, the following, ISO, aperture, and shutter speed. That's it. Three things. Pat yourself on the back, print out your certificate and go and challenge Annie Leibo...Oh yes, we should probably tell you what each of these things are before you do any of that.
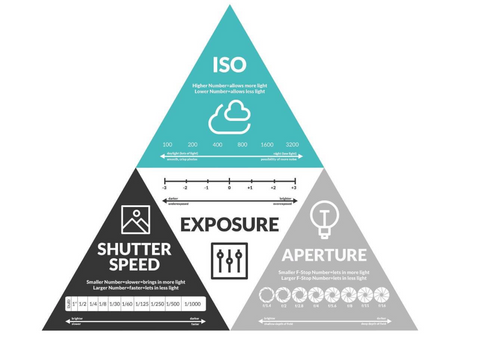
ISO: In layman's terms, the value that measures how sensitive your camera is to light. This acronym stands for the 'International Organization for Standardization', which doesn't actually relate to the measurement and is just a really crappy acronym. It came about after two photography standards, ASA and DIN, were combined into one ISO standard and, although originally used to measure the sensitivity of film, it has become the default way of measuring digital camera sensitivity.
Whilst it is a common myth that ISO is the value for sensor sensitivity, digital cameras only have one sensitivity, and therefore it's actually more like a mapping system that tells your camera how bright your output photo is from a certain input. That being said, if it helps you to think of it as sensor sensitivity for the sake of understanding it, we won't judge you or take away your self-printed certificate.
Common ISOs are as follows:
ISO 100 (low ISO)
ISO 200
ISO 400
ISO 800
ISO 1600
ISO 3200
ISO 6400 (high ISO)
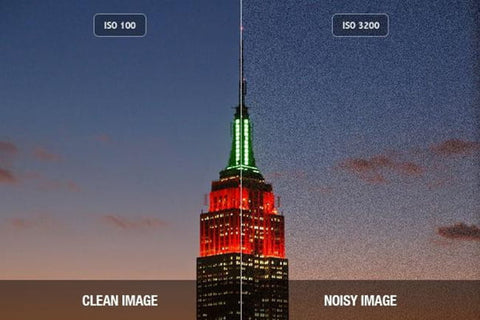
When you double your ISO, you are also doubling the brightness of your photo, so ISO 200 is twice as bright as the base ISO of 100. 'That's great!' I hear you exclaim,'I can take photos in super dark conditions by cranking up the ISO!' Not so fast.Increasing the ISO of your camera also results in much noisier, less sharp photos, meaning you have to balance it carefully with other camera settings to see what works best for the amount of available light and situation. We'll be looking at ISO in more detail in future Back 2 Basics posts, but for now let's move on to...
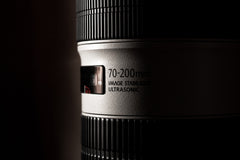
Aperture: In layman's terms, this is the opening in your lens that allows light to enter the camera. I learnt about the importance of lenses when I left my glasses at home and accidentally walked in to the women's bathroom at work. Cameras use lenses to focus light onto the camera sensor - the wider the opening in the lens, the brighter the picture. To control this, lenses have blades that dilate and contract in a similar way to the pupil of your eye, a small opening restricts light, and a wider opening let's more in.
However, amount of light isn't the only thing affected by the size of your hole aperture. It also has an affect on depth of field and bokeh, with wide apertures having a 'shallow depth of field' (focusing on a specific point with one key area in focus e.g. subject in focus, background blurry), and narrow apertures having a 'deep depth of field' (lots of things in focus e.g. subject and background are sharp). Depending on how you want your photos to look in terms of brightness and depth of field, you'll need to change the aperture accordingly AND balance with ISO (and shutter speed) to get ideal results. So far, so good.
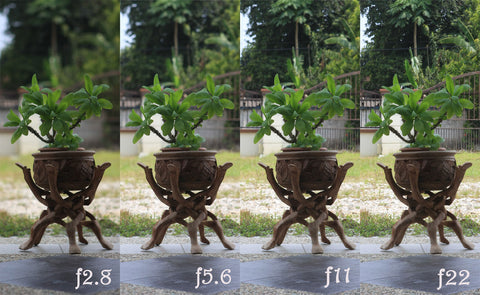
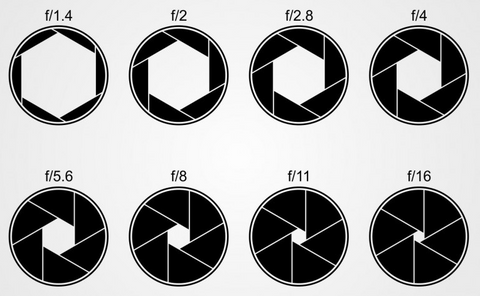
Like ISO, aperture also has a measurement system to help the photographer choose a particular setting and change the depth of field and exposure accordingly. Aperture is measured with an F-number, with lenses outlining the aperture range by usually displaying values of F-something to F-something, e.g. F2.8 to F22, with F2.8 being the widest that your lens can open, and F22 being the most narrow. This can be confusing, as normal, logical human beings we're accustomed to things increasing as a number increases, so what you have to remember here is that as the F-number increases, the smaller the hole gets, the amount of light decreases and the darker your photos become. You can see how this works in the chart below.
|
F-Number |
Aperture Size | Exposure | Depth of Field |
| f/1.4 | Very large | Lets in a lot of light | Very thin |
| f/2.0 | Large | Half as much light as f/1.4 | Thin |
| f/2.8 | Large | Half as much light as f/2 | Thin |
| f/4.0 | Moderate | Half as much light as f/2.8 | Moderately thin |
| f/5.6 | Moderate | Half as much light as f/4 | Moderate |
| f/8.0 | Moderate | Half as much light as f/5.6 | Moderately large |
| f/11.0 | Small | Half as much light as f/8 | Large |
| f/16.0 | Small | Half as much light as f/11 | Large |
| f/22.0 | Very small | Half as much light as f/16 | Very large |
Zoom lenses usually have more narrow apertures than prime lenses, with the F-number on zoom lenses usually starting at around F2.8 to F4, and the F-number for prime lenses starting anywhere from F0.95 to F1.8 (and up), so for this reason you may want to use a specific type of lens for a specific setting, as it will also give you a bit more room for ISO and shutter speed adjustments.
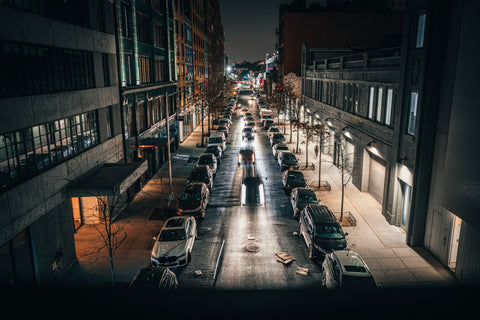
Shutter Speed: The final corner of our exposure triangle. In layman's terms, the amount of time your camera shutter is open, exposing your camera sensor to light and thereby actually taking a photo. Long shutter speeds are often used in astro-photography for capturing the Milky Way, or to make waterfalls look silky smooth. Short shutter speeds are used to freeze movement and motion, for example in wildlife photography or sports.
Unlike ISO (measured in ISO speed) and aperture (measured in F-numbers), shutter speed is measured using good, old conventional time, with fast to medium shutter speeds measured in fractions of a second (e.g. 1/4000s), and longer shutter speeds being measured in seconds. Obviously, the longer your shutter is open for, the more light will enter the camera and the brighter your image will be. Depending on what you're taking pictures of and whether or not there is movement, you'll also get varying amounts of motion blur, and may require other equipment like a tripod, to stabilize your camera.
Combining all three: This is where things get really interesting. Depending on what you're taking pictures of and what results you're looking for, you'll need different settings. To give you an example, consider two very different situations, 1. Taking a photo of a football match on a sunny day and 2. taking photos of a rock formation under a starry sky.
For the football match, it's bright and there is lots of movement to capture, so you'll need a fast shutter speed. Depending on whether you want a shallow or deep depth of field, you'll have to alter the aperture accordingly. ISO probably won't need to be touched because the sunlight should make up for the fast shutter and aperture.
For the starry night, it's a very different story. Lack of light will mean that you'll likely have to bump up the ISO and use a long shutter speed (with a tripod). Depending on what you want in focus, you'll have to change the F-number accordingly and potentially blend together multiple images (called exposure blending) into a single, well-focused shot.
And there you have it. The three main aspects behind your camera settings and how they affect your photography. Before you leave, there is one more section to cover, a list of accessories that will affect the above settings and what you might need them for.
Part 3: Let there be camera equipment...and hence you shall have no money
"And God said to man, 'Go forth and spend your money, and thou shall buy lots and lots of camera equipment that you may or may not need.' And man replied, 'What is this money Thou speakest of?' And God responded, 'Well, you're not going to have much of it anyway after all your camera purchases, so I'm not really sure it's worth me explaining."
Tasty, tasty camera equipment - both the joy and bane of my life. Camera equipment is expensive and, whilst it can serve a purpose, should be purchased with thought and consideration. Below, we've listed out some of the things that will help your photography under certain situations, how they affect your camera settings and why you might want to buy them, but please don't blame us if you can no longer pay your rent. Here we go:
A good tripod: For things like landscape and astro-photography a good tripod is essential - in fact any situation where you want to capture motion blur of a subject but keep the background sharp will require stabilizing equipment of some kind. Good tripods allow for longer shutter speeds, meaning you can use more narrow apertures and lower ISOs.
Camera lighting: If you want to do portrait photography under certain conditions, good camera lighting will help with keeping your ISO low and your pictures clean and sharp in dark situations. Lighting can be anything from a complicated light set up to a small camera flash.
Filters: Usually used for landscape photography, filters help you get correct exposure of your image by reducing brightness, either for the whole image or for parts of it. If you want to get slower shutter shots with an open aperture during the day, a filter can help darken the scene enough to get your results. A gradual filter can darken out the sky but leave the foreground untouched, creating the correct exposure for the whole photo and meaning that you don't have to push the camera settings too far to get your desired results.
Finally! You are done! If you read up to this point you now have everything you need to build up your photography techniques. We'll continue to post more Back 2 Basic content that will take your photography beyond visuals, but in the mean time, go and print off that certificate (no, we're still not finding one for you), have a cup of tea, and go and challenge Annie Leibowitz to that photography duel.
See you next time.
The Beyond Visuals Team 